Setting this blog up on Github Pages
As a birthday present to myself this year, I finally decided to bite the bullet and quit my Twitter addiction. I signed up for Mastodon, which seems nice so far (you can find me here). I’m also hoping to do a little bit more writing with all the spare time I now have on my hands. Some of that will be on Mastodon, but hopefully the longer-form bits will start to appear here.
My blog’s been limping along for some time - the whole infrastructure of writing a post, publishing it, and actually serving the site was basically hand-rolled a long time ago by yours truly. As might be expected, this setup, held together by paperclips and duct tape, fell over all the time. To make the process of writing easier on myself, I decided to migrate to Github Pages. The whole process was surprisingly straightforward, so I thought I’d write it up in case others would find this useful.
What’s Github Pages?
Github is a website that people use to track and share the source code for software they write. One of the satellite services that Github also runs is called Pages. People on Github can host a small personal website, or small project-based websites on Github Pages. I use Github to store the source code of this blog (all the post text and images, theme, etc), so Pages seemed like a natural fit to actually host the site as well.
How do things work now?
Before I dig into the guts of how I set this up, it’s worth talking through what the end result looks like, from writing to publishing.
First, to write a new post, I create a new Markdown file in the repository for this blog. Each post is a separate file.
Once it’s ready, I create a commit on the blog repository’s main branch and push it to Github:
# Add the new post to Git
git add content/posts/my-new-awesome-post.md

# Create a new commit
git commit -m "Add new post: setting-this-blog-up-on-github-pages"

# Push it to Github
git push
If I’m feeling lazy, sometimes I’ll do these steps in VSCode instead, which has a nice GUI for git, but feels slower. I’m not sure if it’s actually slower than typing everything out, though!
Pushing that commit to Github fires off some stuff on Github which regenerates the site in about a minute:
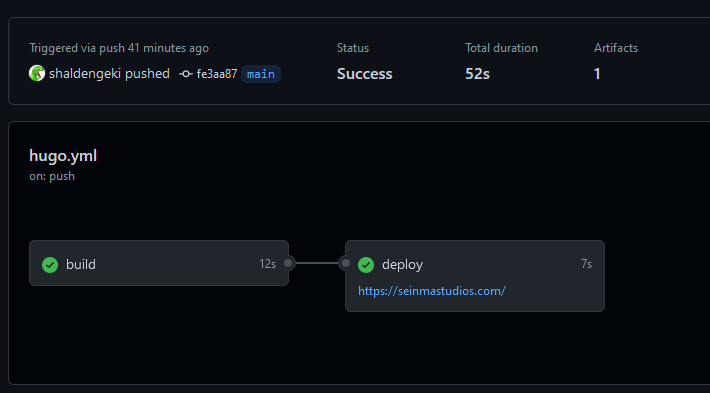
And that’s it! Pretty simple if I do say so myself.
How’s this set up?
For the most part, I just followed Github’s excellent instructions, which you can find here.. You should probably just read their docs, but here’s what I did specifically:
As the zeroth step, I had previously set my website up using Hugo, a blogging software.
First, I went to my repository settings page on Github, navigated to the “Pages” tab, and selected “Github Actions” under “Source”:
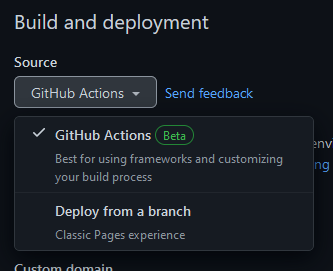
This tells Github that you want your site’s content to be built and deployed via a Github Action (more on that in a bit) and not a custom deployment on a dedicated branch.
The next step is to point your domain to Github. I went to my domain registrar’s DNS configuration page. I had registered the domain under gandi.net, so I signed into their web console, navigated to my domain’s DNS records, and created the following table:

A couple things are worth explaining here:
- The first entry is autogenerated by my domain registrar; I wish I could delete it, but they won’t let me.
- Lines 2-5 are necessary; they point the top-level domain (seinmastudios.com) to Github’s servers.
- Line 6 sets up an alias to point www.seinmastudios.com to seinmastudios.com instead. This is useful, because Github will read this configuration later and set up some nice redirection magic.
I saved these records, and then went back to Github to test my DNS configuration. On the same page as before, under “Custom domain”, I typed in my domain and hit save, which triggered Github to start running a test:
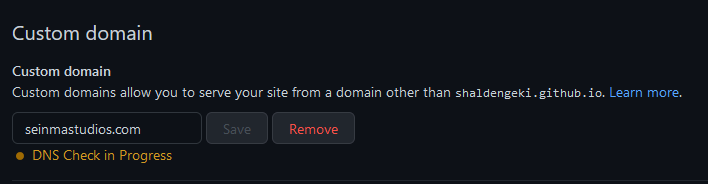
This was by far the trickiest part of the whole setup, because I had to futz with my DNS records a couple times to find the right settings, and DNS records end up being cached unexpectedly. Basically what I ended up doing was walking away for five minutes (the TTL I set in the DNS records above) between changes.
Anyways, once that’s done, it’s time to set up a Github Action to deploy the site to your Github Pages website. To do this, I clicked the “Actions” tab of my repository, clicked “New workflow”, and picked the Hugo workflow (which is the blog website software I use):
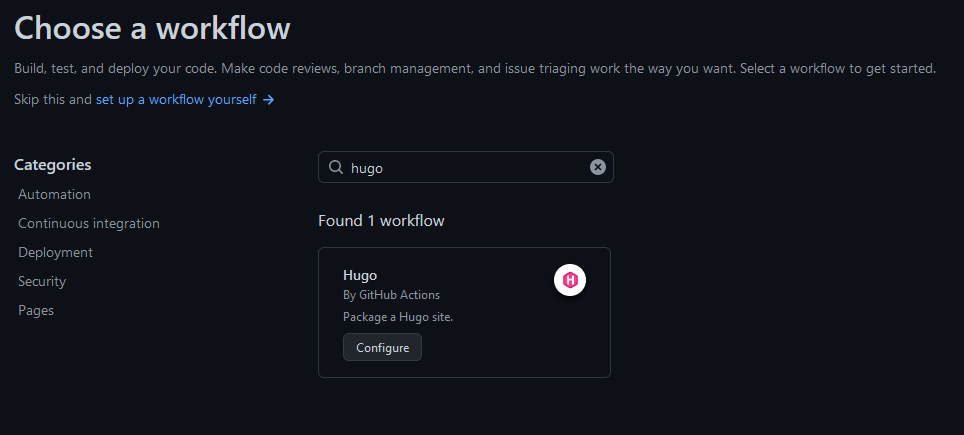
This action comes with a configuration file. I didn’t have to modify it at all - just clicked “Start commit” and committed it directly to my main branch.
At that point, the Action kicked off on my latest master commit, built my website, and pushed my changes - I went to my website and it was working!
Random musings
I’m continually impressed at how easy and straightforward it is to set up a Github Action nowadays that does something that would’ve taken days or weeks of effort on my part. Someone at Github definitely deserves a raise for good work done here. The little bit of configuration in this post allowed me to delete 255 lines of gnarly Ansible code. I’ll miss futzing with it a little, but I think overall I’m much happier - I’ve learned the hard way that less code is almost always better!
The one thing I’ve encountered before with Github Actions is that you have to be careful about depending on third-party actions not maintained by either Github or a company directly invested in maintaining it. For instance, a lot of my side projects used to rely on a Github Action to build Docker container images, which was authored by a (well-meaning) individual not associated with Github, Docker, or any other long-lived entity. This was great for a few months, but predictably the thing fell out of date with Github and Docker APIs, which meant it stopped working all of a sudden one day. I had to find a replacement and rewrite a bunch of YAML configuration for the new action, which was a pain in the neck.
I’m not too worried about the setup I’ve done here, though - this is all using native Github-maintained stuff, so I look forward to a long shelf life for the current arrangement.